Showing posts with label LDAP. Show all posts

Friday, September 28, 2012

Configure "ACTIVE DIRECTORY SERVER" with Samba PDC + OpenLDAP on SUSE LINUX (PART 2)


SETTING LDAP CLIENT
  1. Click YAST | Network Services | LDAP Client
  2. Click Use LDAP pada User Authentication
  3. Fill in Address with server IP or by using 127.0.0.1 as default address
  4. Mark  LDAP TLS/SSL option checked if you choose to use TLS/SSL on previous tutorial, or vice versa, leave it unchecked if you choose to not use TLS on previous tutorial 
  5. Fill in LDAP Base DN (dc=namadomain, dc=tld, ex : dc=vavai,dc=co,dc=id). You may also get the LDAP Base DN by clicking  Fetch DN button
  6. Leave others option as is
    `
  7. Click Advanced Configuration
  8. Change Password Change Protocol to MD5
  9. Leave option Group Member Attribute = Member unchanged
    `

  10. Click Administration Setting
  11. Fill in cn=Administrator on Administrator DN. Don’t forget to give a check on Append Base DN option
  12. Mark a check on Create Default Configuration Objects option
    `
  13. Click OK
  14. Click OK

SETTING SAMBA SERVER PRIMARY DOMAIN CONTROLLER (PDC)
  1. Open YAST | Network Services | Samba Server
  2. Fill in workgroup/domain name on first wizard. I’m usingdomain vavai.co.id as my workgroup name. Click Next
    `
  3. On Samba Server Type option, choose Primary Domain Controller (PDC). Click Next
  4. On start-up tab, choose Service Start During Boot option, so Samba will automatically started on boot. Don’t forget to click Open Port in Firewall if you use firewall on intranet zone
    `
  5. Move to LDAP Setting tab.
  6. Click on Use LDAP Password Back-End
  7. Fill in  Administrator DN and password setting (cn=Administrator,dc=vavai,dc=co,dc=id, adjust it with your domain name). Click Test Connection to test LDAP server connection. If test result is failed, recheck your configuration setting.
    `
  8. Click OK and then fill in Samba root /Administrator password
    `
SETTING USER NAME & PASSWORD
  1. Click on YAST | Security and Users | User & Group Management
  2. Click Expert Options | LDAP User & Group Configuration option on bottom-right-corner menu
  3. Fill in LDAP Admin password (see whether your bind DN configuration has setup correctly)
  4. Move to Configuration Module, and then choose  userconfiguration
    `
  5. Change susemaxpasswordlength with your maximum password length
  6. Change suseminpasswordlength with your minimum password length
  7. Change susepasswordhash from SSHA to  SMD5
  8. Click OK
  9. Click on Set Filter option on top-right-corner menu and choose LDAP Users. This will display all LDAP user list, currently are empty because we have create any user yet
  10. Click Add
  11. Fill in user profile and password
    `
  12. Click OK
Restart all service (or reboot your computer) to test all the service. f you wish to join Windows workstation into Samba PDC+LDAP domain, use the Samba root user name and password as Administrator user. Share folder, Profile, netlogon and custom setting could be modified within YAST | Network Services | Samba Server. Samba LDAP user could be added or modify with the above procedure using YAST | Security & Users | User & Group Management.

Configure "ACTIVE DIRECTORY SERVER" with Samba PDC + OpenLDAP on SUSE LINUX (PART 1)

I have written Samba PDC+OpenLDAP tutorial on openSUSE on previous article but the tutorial are based on manual configuration and need too many steps to make it usable. Now, I want to share how to make Samba PDC+OpenLDAP on openSUSE or SLES with automatic configuration using the YAST way :-) . The tutorial should be easy to understand and and need a few step to make it ready for testing.
INSTALLING OPENSUSE
Install openSUSE 11.2 with or without GUI, choose which one suitable for your purpose. I’m using a GUI example because this tutorial intended for student :-) . a Minimal server selection (text mode) maybe a better option for production server. Please refer to openSUSE 11.2 installation guide if you need an assistance regarding openSUSE installation.
Lucky for Indonesian :-D , I’ve written a PDF tutorial with clear explanation regarding openSUSE installation for this purpose  : Tutorial Instalasi openSUSE 11.2 Versi Server Berbasis GUI
INSTALLING LDAP SERVER
Follow these wizard to install and configure LDAP server :
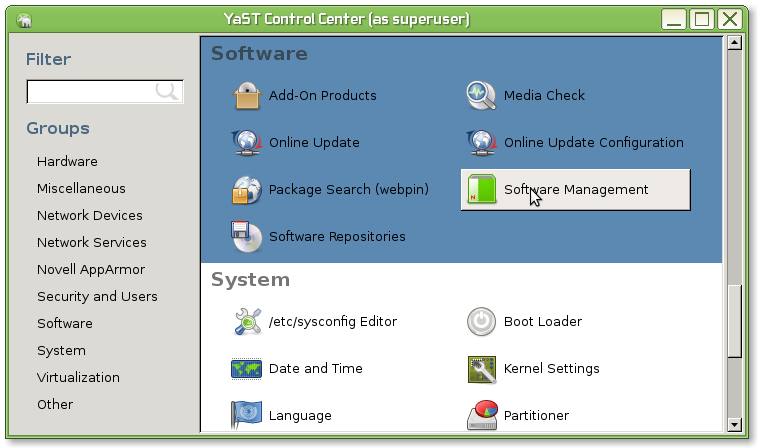
  1. Open YAST | Software | Software Management
    `
  2. Choose View | Pattern
  3. Scroll to Server Function
  4. Give a checked mark on File Server, DHCP and DNS Server, Directory Server (LDAP)
    `
  5. Click Accept
  6. openSUSE should be automatically detect dependency package. Click Continue to install selected package
    `
  7. Close YAST and then open again. I take this step to make sure YAST refresh new package installation and add to it’s menu
  8. Choose YAST | Network Service | LDAP Server
  9. Click Yes on Start LDAP Server. Give it a check mark on Open Port in Firewall if you use firewall. Leave others as is and then click Next
    `
  10. Click Enable TLS and then create TLS Certificate by using Launch CA Management Module button and follow the wizard. Leave it unchecked if you wish to use LDAP without TLS connection.
    `
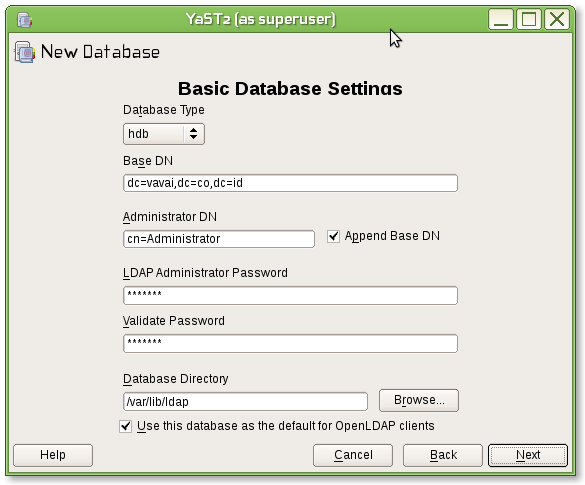
  11. On basic database setting fill in the default database setting :
    01.Database Type : hdb
    02.Base DN : dc=domainname, dc=tld
    03.Example :
    04.If my  domain = vavai.co.id, configuration will be like this : Base DN = dc=vavai, dc=co, dc=id
    05.If my domain = vavai.com, configuration will be like this : Base DN = dc=vavai, dc=com
    06.Administrator DN : cn= Administrator. Leave  Append Base DN option checked
    07.Don't forget to fill your  LDAP Password
    08. 
    09.Also, leave a check mark on  "Use this database as the default for OpenLDAP"
    Click Next if all setting has been completed.
    `
  12. Click Finish
    `
ADD SAMBA SCHEMA
  1. Open YAST | Network Services | LDAP Server
  2. Click Schema Files on left pane menu
  3. Click Add and add Samba3.Schema so we will have following LDAP Schema : schema, core, cosine, inetorgperson, rfc2307bis,yast and samba3
    `
  4. Click OK
Next Tutorial are LDAP Client Configuration
UA-39498145-1